Clip Studio Paint Brush Settings
Clip Studio Paint is an excellent application for illustrators and comickers, and has a robust engine for making brushes!
The only downside, though, is that a lot of settings are hidden under sub-menus, and may be difficult to find if you're unfamiliar with it.
The settings I am introducing you to can be also found in the "Window" menu at the top of your screen.

-
Open the Tool Property menu.
If you haven't modified your Clip Studio workspace, this might be in a different location than where it is on mine -- I moved my Sub-Tool and Tool Property menus to be beside one another.
In my case, it's found here:


-
You'll see some basic properties, varying from tool to tool.
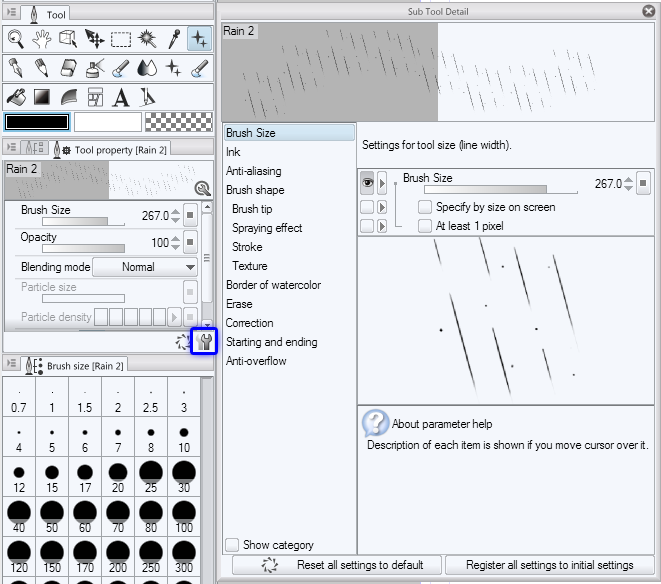
Click the wrench icon at the bottom of the menu to open the Sub Tool Detail menu.
Further details on the Tool Property palette are expounded upon in the documentation.

-
Go through the options and modify them to your liking.
Celsys' documentation goes into a fair bit of detail as to what the icons mean.
When you hover over each setting, you will be shown a description of what that setting actually does.
While modifying tool settings, you CAN draw on the canvas at the same time to experiment.

Quick tip: Anytime you see this square, you can configure additional behavior.

- Brush Size
The Brush Size menu is just that. By default, the size slider is visible in the Tool Property menu.
"Specify by size on screen" means that the brush's size will remain proportionally the same in relation to your screen -- not to the size of the document.
"At least 1 pixel" simply refers to not letting the brush dip below 1px in size. (There are smaller sizes in CSP. Somehow.) - Ink
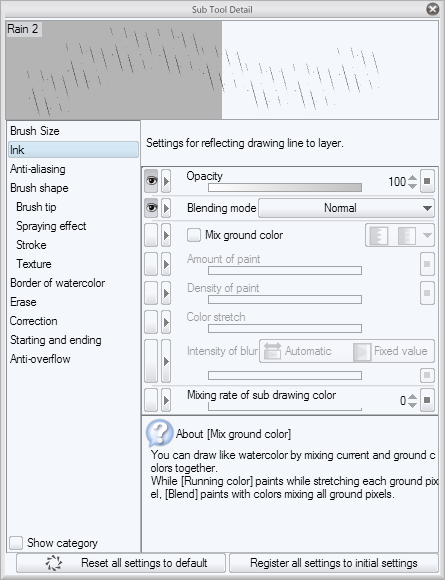
This goes over the brush's overall opacity, blending mode, and painterly settings. If you set "Mix Ground Color," it will blur with the color you're drawing on top of.
The Blending mode option can be used to create new erasers by setting the mode to "Erase". - Anti-aliasing
How rough or blurry do you want your brush edges to be? This screen also shows you a preview of what that may look like. - Brush Shape
The primary section is often largely ignored as it has a bunch of presets. Move on to Brush tip.- Brush Tip
Here, you can set a custom brush tip from an image in your materials library, and alter its thickness and the direction of which it is set down on the canvas. - Spraying Effect
When you enable a spraying effect, you are presented with a "particle size" option, which is handled totally separately from the brush size. I strongly advise setting particle size as a visible property for any tools where you intend to use spraying effects, as it will make your life easier when you need to change the size of the sprayed object.
The other settings should be fairly self-explanatory.
Large particle densities may cause lag. - Stroke
This has to do with the settings of your brush and its spacing, much like the spacing option in Photoshop.
The ribbon setting may be used to create a brush which moves along with the direction of your stylus. - Texture
You can utilize any texture which you've defined in your materials as a paper texture. I don't have much to say on this, as I've barely used it.
- Brush Tip
- Border of Watercolor
This setting causes a slight darkening on the edges of your brush stroke. When used in conjunction with textures and other options, it can be used to (somewhat) emulate watercolor.
Use this setting with caution, as it may cause your brush strokes to lag. If you must use it, then I strongly suggest enabling "Process after drag" to ensure performance is not affected too badly. - Erase
This menu is not usable unless your blending mode in "Ink" is set to erase. - Correction
This is where you find stabilizers, automatic corrections, and other options. "Able to snap" is also important to enable if you use the ruler tools for anything. - Starting and ending
This section allows you to set specific behavior (such as width or direction) at the start and the end of a brush stroke. This will be automatically applied after you've finished drawing a line. - Anti-overflow
These settings pertain more to coloring -- but can be helpful if you use reference layers. Basically, if you have a reference layer set up, whatever you're drawing won't go outside of areas drawn inside it.
- Brush Size


